Installing Sec-Wall on Ubuntu: Secure Web Traffic with SSL/TLS
4 - 8 min read

Topics Covered
sec-wall, a recently released security proxy is a one-stop place for everything related to securing HTTP/HTTPS traffic. Designed as a pragmatic solution to the question of securing servers using SSL/TLS certificates, WS-Security, HTTP Basic/Digest Auth, custom HTTP headers, XPath expressions with an option of modifying HTTP headers and URLs on the fly.
This article is an introductory material that will guide you through the process of installing the software on Ubuntu and preparing the first security configuration - using HTTP Basic Auth with and without tunneling it through SSL/TLS.
The core of sec-wall is a high-performance HTTP(S) server built on top of gevent framework which in turn is a Pythonic wrapper around the libevent notification library.
Most of the project's dependencies may be fetched using apt-get and that's what will be used below. Note the installation of pip, an installer for Python packages, it will come in handy because Spring Python, another of the project's dependencies isn't available in Ubuntu repositories yet (although there's an ITP for that). Installing zdaemon with pip will make sure the command will be consistently available under the same name regardless of the Python version you're using. pip will also be used for installing sec-wall itself, the software's just too new for there being a DEB in the repositories.
$ sudo apt-get install python-pip python-pesto python-gevent python-yaml python-lxml
$ sudo pip install zdaemon
$ sudo pip install springpython
$ sudo pip install sec-wall
And that's it, we can proceed to use sec-wall now.
Firstly, an instance of the proxy needs to be initialized in an empty directory. That sets up the place for future internal log files, places a dot-prefixed 'hidden' file to mark the directory as belonging to a sec-wall instance and - most importantly - creates a skeleton config file, one that we need to customize.
$ mkdir ~/sec-wall-tutorial
$ sec-wall --init ~/sec-wall-tutorial
Note the newly created ~/sec-wall-tutorial/config.py file, it's the central place for configuring a sec-wall instance, that's where the actual configuration takes place. The file is a regular Python source code file which means it's very readable and there's no need for learning yet another specialized config format. Besides, being written in Python, it means the configuration can be fetched from any data source, be it an SQL database, LDAP etc.
Let's have a closer look at the config.py file:
# -*- coding: utf-8 -*-# stdlib
import os.path as path, uuid

# Don't share it with anyone.
INSTANCE_SECRET = '12a857db5b1d49e887a0e448429d2826'

# May be shared with the outside world.
INSTANCE_UNIQUE = uuid.uuid4().hex

# Useful constants
cur_dir = path.dirname(__file__)

# Crypto
keyfile = path.join(cur_dir, './crypto/server-priv.pem')
certfile = path.join(cur_dir, './crypto/server-cert.pem')
ca_certs = path.join(cur_dir, './crypto/ca-cert.pem')

# ##############################################################################

def default():
    return {
        'ssl': True,
        'ssl-cert': True,
        'ssl-cert-commonName':INSTANCE_SECRET,
        'host': 'http://' + INSTANCE_SECRET
    }

urls = [
    ('/*', default()),
]
By default, no client applications are allowed in. To achieve it, an application is required to have an SSL/TLS certificate and that certificate's commonName field must be equal to an INSTANCE_SECRET variable which - as stated in the reference documentation and repeated in the config file - should always be a secret known only to sec-wall admins.
The 'urls' variable is the starting point - that's where an URL pattern is being matched with the accompanying security configuration and as stated above, the default configuration is paired with a catch-all /* pattern, hence the result of no one being let in by default.
Let's we'd like the URL paths beginning with /admin/ to be fenced with HTTP Basic Auth. What we need to do is to add add an URL pattern and have it use a proper security config, just like below:
# -*- coding: utf-8 -*-# stdlib
import os.path as path, uuid

# Don't share it with anyone.
INSTANCE_SECRET = '12a857db5b1d49e887a0e448429d2826'

# May be shared with the outside world.
INSTANCE_UNIQUE = uuid.uuid4().hex

# Useful constants
cur_dir = path.dirname(__file__)

# Crypto
keyfile = path.join(cur_dir, './crypto/server-priv.pem')
certfile = path.join(cur_dir, './crypto/server-cert.pem')
ca_certs = path.join(cur_dir, './crypto/ca-cert.pem')

# ##############################################################################

def admin():
    return {
        'basic-auth': True,
        'basic-auth-username':'my-user',
        'basic-auth-password':'my-password',
        'basic-auth-realm':'Secure area',
        'host': 'http://'
    }

def default():
    return {
        'ssl': True,
        'ssl-cert': True,
        'ssl-cert-commonName':INSTANCE_SECRET,
        'host': 'http://' + INSTANCE_SECRET
    }

urls = [
    ('/admin/', admin()),
    ('/*', default()),
]
The expression '/admin/
Use the sec-wall command to start the proxy, passing it the name of the directory the config.py file is in as its only argument, like here:
$ sec-wall --start ~/sec-wall-tutorial
The proxy will start on port 15100 by default so in another browser's tab fire up the address and witness the pop-up asking you for credentials (my-user/mypassword remember?). Now open the URL and you will be greeted with a "You are not allowed to access this resource" message, that because the latter URL fall into the /* pattern whose course of action is to reject any requests.
How about making the traffic be wrapped in SSL/TLS, how hard is it to expose the proxy through HTTPS instead of HTTP?
The proxy needs to be stopped first:
$ sec-wall --stop ~/sec-wall-tutorial
Let's have a closer look at keyfile, certfile and ca_certs variables from the config file. They specify paths to PEM-formatted files to, respectively, the private key, certificate and the list of CAs the proxy is willing to trust. For the sake of keeping the article focused on sec-wall, we'll be using a set of already prepared crypto files that can be found in the attachment.
Put the PEM files in a newly created ~/sec-wall-tutorial/crypto directory:
$ mkdir ~/sec-wall-tutorial/crypto
What's left now is to specify that the proxy's underlying server must be of 'https' instead of the default 'http' one. The 'server_type' variable does just that:
# -*- coding: utf-8 -*-# stdlib
import os.path as path, uuid

# Don't share it with anyone.
INSTANCE_SECRET = '12a857db5b1d49e887a0e448429d2826'

# May be shared with the outside world.
INSTANCE_UNIQUE = uuid.uuid4().hex

# Useful constants
cur_dir = path.dirname(__file__)

# Crypto
keyfile = path.join(cur_dir, './crypto/server-priv.pem')
certfile = path.join(cur_dir, './crypto/server-cert.pem')
ca_certs = path.join(cur_dir, './crypto/ca-cert.pem')

server_type = 'https'

# ##############################################################################

def admin():
    return {
        'basic-auth': True,
        'basic-auth-username':'my-user',
        'basic-auth-password':'my-password',
        'basic-auth-realm':'Secure area',
        'host': 'http://'
    }

def default():
    return {
        'ssl': True,
        'ssl-cert': True,
        'ssl-cert-commonName':INSTANCE_SECRET,
        'host': 'http://' + INSTANCE_SECRET
    }

urls = [
    ('/admin/', admin()),
    ('/*', default()),
]
And now the proxy may started and accessed at the address so that the traffic between a client application and sec-wall is being encrypted.
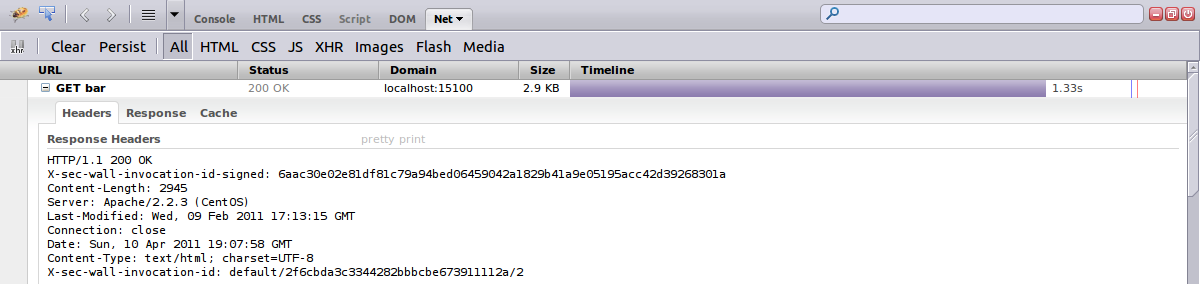
sec-wall is full of customization options yet all of them have sane defaults so that you don't have to deal with it at all if you're not interested in a given functionality. But these interesting features are there. For instance, you probably haven't noticed it but each time you were accessing sec-wall, the proxy was returning a pair of custom HTTP headers, X-sec-wall-invocation-id and X-sec-wall-invocation-id-signed whose purpose is to uniquely identify each of the requests proxied over and to prove the request has actually passed through sec-wall - it's useful when client and backend applications can't get to an agreement over who sent what and when. See the Firebug session's capture for an overview of how it looks like.
That would conclude the introduction, don't hesitate to let us know if you'd like to learn more about sec-wall and don't forget that it's a friendly open-source project whose author is always keen to hear about what people would like to use the software for. In other words, it's there for you, speak up if you think anything's missing or should be better tailored towards your needs!
Resources
- Visit us at
- Contact Dariusz Suchojad <
This email address is being protected from spambots. You need JavaScript enabled to view it. > - Download image of secured headers (PNG)
- Download certificates ZIP


Powered By

Linux Security - Your source for Top Linux News, Advisories, HOWTOs and Feature Releases
QUICK LINKS
subscribe to newsletters!
Like staying secure? So do we.
Sign up for updates, tips, and alerts!